担担麵
材料:
細麵 二兩/75克
麻醬 兩茶匙
雞湯 三大匙(或三大匙熱水加1/4茶匙雞粉)
醬油 一大匙
黑醋 一茶匙
紅油+辣椒渣 一大匙 (中辣)
花椒粉 少許
蔥花 少許
做法:
一. 開水煮麵 (水裡加一點鹽)
二. 麻醬用雞湯稀釋調勻,加入醬油,黑醋,紅油
三. 麵煮好倒入調醬的碗中,撒上花椒粉與蔥花,拌勻即可食
註一.可另加蒜泥,花生粉,榨菜,或炒肉末,但有基本的調料就很好吃了。
註二.捨麻醬多加一匙醋是酸辣麵,捨麻醬加一小匙蒜泥與砂糖是紅油燃麵。
四川泡菜
周老師的美食教室把這道菜的做法介紹的好極了!
獨門紅油
材料:
辣椒粉 三大匙
匈牙利紅椒粉(paprika) 一大匙
鹽 一小匙
大蒜 兩顆拍碎
植物油 一碗
做法
一. 把辣椒粉,紅椒粉,鹽拌勻置於碗中 (紅椒粉微帶煙燻味,不辣,調入油中可提升色澤的紅艷度)
二. 中火熱油,大蒜倒入炸到香即關火,靜置降溫五分鐘
三. 撿出大蒜,溫油倒入辣椒粉碗中稍稍攪拌,靜置數小時可入味
Friday, November 28, 2008
Thursday, November 27, 2008


This recipe first appeared in the New York Times in November 2006. Mark Bittman visited the Sullivan Street Bakery where Jim Lahey, who devised this tasty bread and its unique cooking method, demonstrated how to make this bread.
This was one of the most emailed articles from the New York Times, because its simple and results in a magnificant loaf of bread.
Unlike most recipes that have you hunting in speciality stores for ingredients you will never use again, this recipe has four basic ingredients: Flour, water, salt and yeast. No sugar or added fats. And it's inexpensive - one standard package of yeast will make about 6 loaves of bread! I estimate ingredients for this bread cost about 50 cents - you would pay $3.00 to $4.00 for this loaf in an artisan bakery! Plus, there is NO KNEADING! None! Time does all the work in creating the gluten that gives bread its unique structure.
Time and patience are the key elements to making this recipe work. The bread needs 19-24 hours to work its magic prior to baking.
The following is a visual guide to making this delicious bread, based on much experimination with various techniques and tools.


Once your dough has rested for 12 hours, it should be very bubbly and doubled in size. You can choose to stir the dough down and have it rise again if you need to delay the baking process, up to 24 hours or more, especially if you like more of a sourdough taste. Don't worry that there will be spoiling or mold formation. The live yeast are producing carbon dioxide and alcohol, which keeps all the nasty bacteria away, plus they have a hard time with the starch anyway. Another bacteria, lactobacillus, is producing lactic acid, which gives sourdough bread its great tangy taste. I find that if you make the dough in the evening, stirring it down in the morning and then letting it rise again during the day gives excellent results.
In a large glass or ceramic mixing bowl, (NOT metal) combine:
3 cups all purpose flour or bread flour
1 1/2 - 2 1/2 teaspoons salt (depends on your taste)
1/4 teaspoon instant yeast
Mix well to combine dry ingredients
Add:
1 1/2 cups water
3 cups all purpose flour or bread flour
1 1/2 - 2 1/2 teaspoons salt (depends on your taste)
1/4 teaspoon instant yeast
Mix well to combine dry ingredients
Add:
1 1/2 cups water
Mix well with a spoon. No need to beat this , just get all the flour absorbed - you might need a little extra water if it's very dry where you are. Make sure you purchase instant yeast such as Rapid Rise from Fleischmann's or Quick Rise from Red Star. You only need 1/4 teaspoon, not the whole package. Fold the foil package that the yeast came in and place it in a zipper bag in the refrigerator for the next loaf.
Cover your dough (it will not be very pretty) with plastic wrap and place in a warm place (at least 70 degrees). I find the microwave oven (off, of course) makes an excellent resting place. I usually make this in the evening so I can bake bread the next evening. In some ways, this is easier than conventional bread baking where everything happens in compressed time - you end up baking until 11 at night. With this method, this first step takes just five minutes.
Cover your dough (it will not be very pretty) with plastic wrap and place in a warm place (at least 70 degrees). I find the microwave oven (off, of course) makes an excellent resting place. I usually make this in the evening so I can bake bread the next evening. In some ways, this is easier than conventional bread baking where everything happens in compressed time - you end up baking until 11 at night. With this method, this first step takes just five minutes.
If your dough has not risen significantly, it could be that your yeast was old and no longer active...you may want to give it some more time to allow naturally occuring yeasts to multiply. In the middle ages, there was no yeast for sale so folks relied on natural wild yeasts that are always flying around in the air. For consistency, using yeast you buy is a better idea.
This part can be a little sticky and tricky, so be patient. Your dough should be well risen after the 19-24 hour rest period. Sprinkle some flour over the top and start scooping the dough together - use more flour if you need to. Place the dough on a well-floured piece of parchment paper. It MUST be WELL floured, or the dough will stick. Now, simply fold the dough from the sides, and then the top and bottom, like you were folding all four sides to the center, and flip it over. Roll up the top of the parchment paper so the dough has a little covering, like a tent. Parchment paper should be available in any grocery store - you can also use waxed paper.
The original recipe from the New York Times called for the dough to be placed in a towel. Both times I tried that I had a sticky mess on my hands - others who have baked this bread and written up their results on blogs have reported the same problem. I have used the parchment three times and it works much better than the towel method - cleaner too as you can just throw the parchment paper away when finished.
Now, let the dough rest in the paper from 1-2 hours, or until about doubled in size. I usually do this out on the counter.
Now, let the dough rest in the paper from 1-2 hours, or until about doubled in size. I usually do this out on the counter.
Perhaps the second most crucial part of this recipe (after the long rise period) is the selection of a baking dish. You need to essentially create "an oven within an oven" which will produce the steam you need to achieve the wonderful crust. Commercial bakeries have steam injection ovens which keep the humidity high while baking to aid in crust formation. Other bread baking methods call for pans of water in the oven, spraying the bread with water while baking, or even placing ice cubes in the oven! I DO NOT recommend any of these methods - one person reported on a blog that placing ice cubes in a hot oven warped the floor of her oven, which could not be repaired.
Selecting a proper baking pan means finding a round baking dish that can handle lots of heat and has a lid. In the original recipe, a Le Creuset dutch oven was recommended, in the 4 to 5 quart size. If you have such an implement, by all means use it. This cast iron enameled pot is perfect. However if you do not already own one they are not cheap, costing well over $150. A tip - place foil over the knob on the lid to protect it from the extreme heat. There are other less expensive alternatives. Some on internet sites have recommended a clay baking pot like a Romertopf, the inside of a crock pot (the crock part), Corningware or Pyrex.
I bought new Pyrex and it seems to work quite well. Many though have warned that Pyrex could be dangerous and possibly shatter, so use at your own risk! I bought a 5 quart bowl and use a Pyrex pie plate as a lid - a $10.00 solution. As Pyrex ages, it becomes more likely to shatter due to the continuous heating and cooling, so if you go the Pyrex route, buy new. Some have also used their Cephalon dutch ovens, but have reported sticking and cleaning problems. Also, do not be tempted with a knock-off Le Creuset...I saw one in a big box store for $39.00, but the knob at the top would not have taken the high temperature needed for this bread.
I bought new Pyrex and it seems to work quite well. Many though have warned that Pyrex could be dangerous and possibly shatter, so use at your own risk! I bought a 5 quart bowl and use a Pyrex pie plate as a lid - a $10.00 solution. As Pyrex ages, it becomes more likely to shatter due to the continuous heating and cooling, so if you go the Pyrex route, buy new. Some have also used their Cephalon dutch ovens, but have reported sticking and cleaning problems. Also, do not be tempted with a knock-off Le Creuset...I saw one in a big box store for $39.00, but the knob at the top would not have taken the high temperature needed for this bread.
About 1/2 hour before baking, place your baking dish as selected above in a cold oven to pre-heat. You should not need to grease the pan, but you can if you choose to. I have found it unecessary with the Pyrex. Set the oven to 475 degrees - a very hot oven, so be careful! When the oven has reached that temperature, open the oven door and pull out the rack (wearing oven mitts) with your preheated pan. Take the dough in the parchment paper and "plop" it into the pan - PLEASE BE VERY CAREFUL AS THE OVEN AND THE PAN ARE VERY HOT!!! It does not need to be all nice and perfect - this is a rustic loaf. Carefully place the lid on the pot and slide slowly back into the oven. Close the oven door and set the timer for 30 minutes.
DO NOT OPEN THE OVEN DOOR TO PEEK! If you oven has a window and light, you can watch the bread do its final rise or "oven spring" (if you are using Pyrex). Otherwise, you will have to curb your curiosity. Don't worry if a lot of the flour from the parchment ended up on the bread - it will actually add to the look of the bread when it's finished. Also, remember that when the yeast was "brewing," it was producing alcohol - the very small amount produced will burn off during the baking process. The yeast used in baking is actually the same type used in brewing beer, latin name Saccharomyces cerevisia.
After 30 minutes, open the oven and CAREFULLY remove the pot lid, wearing your oven mitts. Set the lid in a safe place, away from any children or pets, to cool. Close the oven door and set your timer for 20 minutes - oven temperature stays the same at 475 degrees. After 20 minutes, check the loaf to see if it has sufficiently browned. If not, let it bake an additional 5-7 minutes.
After 30 minutes, open the oven and CAREFULLY remove the pot lid, wearing your oven mitts. Set the lid in a safe place, away from any children or pets, to cool. Close the oven door and set your timer for 20 minutes - oven temperature stays the same at 475 degrees. After 20 minutes, check the loaf to see if it has sufficiently browned. If not, let it bake an additional 5-7 minutes.
Now, the moment! Carefully remove the baking bowl from the oven, wearing your oven mitts. Flip the bread out of the baking dish and carefully place the bread on a cooling rack. Turn off the oven and return the baking dish to the oven to gradually cool down.
If all went right, you should have a beautiful rustic loaf that will SING to you - as the bread cools, you will hear crackling noises which indicate your crust is perfect! See what a nice finish the dusting flour gives?
RESIST the temptation to cut open your cooling bread. It must sit at least one hour before slicing.
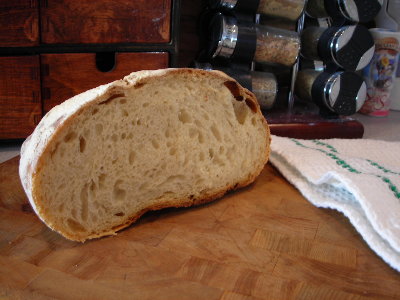
The fruits of your labor are evident! After a few successes with this basic recipe, allow your imagination to take over - use different types of flour such whole wheat, rye or spelt; add things such as chopped olives or dried tomatoes. I cut my loaves with an electric knife, but any good bread knife will also do the trick.
Storage: Keep this bread out of the refrigerator! It will ruin the crust. Keep it cut side down covered with a piece of paper or a towel. That keeps the moisture in but does not ruin the crust. Keeping in a zipper bag will also cause the crust to become less crunchy.
Storage: Keep this bread out of the refrigerator! It will ruin the crust. Keep it cut side down covered with a piece of paper or a towel. That keeps the moisture in but does not ruin the crust. Keeping in a zipper bag will also cause the crust to become less crunchy.
http://www.youtube.com/watch?v=13Ah9ES2yTU
美味比司吉
http://blog.yam.com/tzui/article/14003023
生平第一次吃比司吉 (biscuits) 是在肯德雞,當時年紀小,看到這個金黃圓胖,鬆軟程度介於麵包與蛋糕之間的奶油餅驚為天人,搭配隨餐附送的蜂蜜或果醬尤其美味。長大後不太常去速食店,漸 漸也就忘了比司吉的可口,直到認識在南卡羅萊納州度過童年的Jim,才重新燃起對這個傳統美國南方佐餐包的熱情。
不管早中晚哪一餐,只 要家裡沒有麵包或尚未準備麵飯主食,Jim的第一反應通常是開始和麵準備比司吉,從舀麵粉到進烤箱不須十分鐘,效率驚人。比司吉在點心烘焙裡通常被歸類為 速成麵包 (quick bread), 就是因為它製作簡便,麵團靠小蘇打或泡打粉瞬間膨脹,無需長時發酵。唯一的秘訣就是和麵動作要輕,柔,快 - 牛奶注入裝在大碗裡的麵粉後只需用筷子或叉子攪拌幾下,有點結塊不均勻也沒關係,然後倒在桌上輕輕揉幾下就可以擀開切塊。總之動作愈輕愈少,麵筋就愈不發 達,烤出來的餅才會鬆軟。
傳統的比司及是用豬油或馬其林做的。豬油和馬其林都是100%的油脂,油脂愈多烤出來 的餅就愈鬆軟(油脂包裹著麵粉會杜絕水分,減少麵筋的形成),但兩者都比較不健康 (尤其馬其林屬於氫化油會增高膽固醇),所以我喜歡用奶油來代替。奶油的油脂含量不超過80%,其餘的成份是奶蛋白,有助於增加香氣而且遇熱會產生金黃漂 亮的色澤,雖然因為油脂含量較低難以創造入口即化的糕餅口感,在我看來還是有它的優勝之處。
已故的美國南方女大廚與食譜作家 Edna Lewis 曾在訪談中 提到,當年她在紐約著名的傳統南方餐廳 Cafe Nicholson 做主廚時,常有藝文界的青年俊彥來捧場,其中她最喜歡的就是"第凡內早餐"的作者楚門卡波提 (Truman Capote),因為這個 “漂亮的男孩常跑進廚房裡跟我要比司吉吃"。由此可見吃比司吉的男生特別討人喜歡而且會激發母愛,我們家的Jim就是活生生的例證。
比司吉做法:
烤箱預熱華氏450°/攝氏230°
中斤過篩麵粉 1 3/4 杯/200克
鹽 半茶匙
泡打粉 一大匙
固狀冷奶油 六大匙/85 克
牛奶 3/4 杯/170毫升
雞蛋 一個
- 以大碗呈裝麵粉,鹽,與泡打粉
- 奶油切塊加入大碗內,以手指捏碎,直到奶油與麵粉融合呈餅乾屑狀
- 注入牛奶,輕輕以筷子攪和直到成團
- 將麵團移至灑了麵粉的桌面,輕輕揉兩三下
- 把麵團擀成兩公分厚,以直徑五公分左右的餅乾模型或圓口細邊的杯子切成圓胚,移至鋪了烘焙紙的烤盤 ( 若烤箱仍未達預熱溫度,在此可將餅胚先放入冰箱或冷凍庫保存)
- 蛋打散,餅胚表面刷上蛋汁
- 入烤箱約十二分鐘,直到厚度膨脹,表面金黃
(Adapted from The Joy of Cooking)
Saturday, November 22, 2008
Chai Tea
Ingredients
- 1 tablespoon fennel seed
- 6 green cardamom pods
- 12 whole cloves
- 1 cinnamon stick
- 1 (1/4-inch) piece ginger root, peeled and thinly sliced
- 6 black peppercorns
- 7 cups water
- 2 tablespoons Darjeeling tea
- 4 tablespoons brown sugar
- 1 cup milk
Directions
In a medium saucepan, combine fennel seed, cardamom, cloves, cinnamon stick, ginger root, peppercorns and water. Boil for 5 minutes. Remove from the heat and steep for 10 minutes. Add the tea, bring to a boil, reduce the heat, and simmer 5 minutes.
Strain mixture, discard spices and return the tea to the saucepan. Stir in the brown sugar and milk. Serve immediately.
Wednesday, November 12, 2008
沙瓦調酒4款 水果風 散微醺
 | ||
| 微鹹的酸梅水與番茄汁的搭配相當得宜,有著香濃的番茄滋味。 |
大廚上菜
周末的夜晚,偶爾想來點微醺的感覺,卻又不想喝得醉醺醺,我想起日本最知名的可爾必斯沙瓦,於是央求「鈴藤隱酒藏」的年輕店長趙國全,用蘋果、番茄、葡萄柚等,教大家幾款清爽果香的日式沙瓦調酒,讓你在家就能度過醺醺然的一夜。報導╱王彥蘋 攝影╱高大鈞
| 果風酒香1 番茄梅香沙瓦 材料:小番茄1顆、市售番茄汁1瓶、酸梅4顆、熱水150ml、番茄利口酒少許、奧之松金紋酒少許、香檳杯1只、碎冰適量 準備 酸梅以熱水泡開備用。 | ||||||||
香檳杯加碎冰至滿杯,倒入番茄汁至1/3杯處。 | ||||||||
加酸梅水至2/3杯,再倒入番茄利口酒至8分滿。 | ||||||||
倒入奧之松金紋酒至滿,擺上對切的小番茄裝飾即可。 | ||||||||
| Tips:奧之松金紋酒為清酒的1種,可以任何甘口的清酒取代。 | ||||||||
材料:葡萄柚1/2個、濃縮葡萄柚汁30ml、麥燒酒30ml、無糖蘇打水1瓶、新鮮葡萄柚丁適量、薄荷葉1片、冰塊適量、Highball杯1只 |
)
)
)
)
冰塊入杯中約7分滿,葡萄柚榨汁後倒入杯中,續加入濃縮葡萄柚汁、麥燒酒後拌勻。 | ||||||||
加無糖蘇打水至9分滿,再以葡萄柚丁及薄荷葉裝飾即可。 | ||||||||
| Tips:Highball杯可用一般高度較高的水杯取代。 | ||||||||
材料:蘋果濃縮汁45ml、麥燒酒30ml、無糖蘇打水1瓶、薄荷葉1片、醃漬紫蘇蘋果1小塊、冰塊適量、威士忌杯1只 | ||||||||
冰塊注入威士忌杯中約7分滿,加入蘋果濃縮汁。 | ||||||||
加入麥燒酒稍攪拌,續加蘇打水至9分滿。 |
)
)
)
)
)
最後再放上紫蘇蘋果塊與薄荷葉裝飾即可。 | ||||||||
| Tips:紫蘇蘋果塊可自行將蘋果切塊後,加適量的紫蘇葉和糖熬煮,亦可用紫蘇梅取代。 | ||||||||
材料:濃縮可爾必斯30ml、麥燒酒30ml、冰水210ml、冰塊適量、Highball杯1只 準備:可爾必斯與冰水以1:7的比例調和備用。 | ||||||||
將冰塊注入杯中約8分滿,加入調和過的可爾必斯至分滿,再加入麥燒酒即可。 | ||||||||
喜愛日本文化 投身餐飲 擔任Sake Bar店長的趙國全,提起日本,他顯得相當開心,未來還打算去日本念書,找個餐廳打工,深入研究一下日本飲食文化 | ||||||||
| 麥燒酒 適合調酒 這回請他用燒酒與清酒做調酒,他說,「一般用來調酒的日本酒,大多是燒酒,尤其今天用的麥燒酒,酒味重、酒精低,適合想喝酒、但又不想喝醉的人。」 由淡到濃,趙國全教我4款日式沙瓦(SAWA),他說,「只要是用日本酒所調的酒,都可以叫『沙瓦』。」除常見的基本款「可爾必斯沙瓦」,其餘3款都充滿水果香氣與酸甜,像葡萄柚沙瓦,酸甜的清香,適合喜愛自然風的人。 |
)
)
)
)
| 哪裡買 清酒、麥燒酒可至開元食品、全台橡木桶門市、各地進口超市購得 紫蘇蘋果塊可在日本進口食材店購得:富帆 02-8221-6288 番茄利口酒、水果濃縮原汁可在進口商處購得:開元食品 02-2503-4622 |
| 協助拍攝╱鈴藤隱酒藏 台北市仁愛路四段345巷2弄15號A區 02-8771-8002 |
| 每日一招 清酒甘辛 可看標示 一般到酒吧喝清酒,常會被問到喜歡甘口或是辛口,這「甘」跟「辛」指的就是酒的口感,甘口酒較溫潤不嗆,辛口較辣。如果到超市自行選購的話,有些標籤上會有「酒度」,酒度成正值則愈高愈辛口,從0到負值則愈低愈甘口。 |
Monday, November 03, 2008
http://www.foodnetwork.com/recipes/alton-brown/salsa-recipe/index.html Salsa
Salsa
- 6 Roma tomatoes, chopped
- 4 garlic cloves, minced
- 2 seeded and minced jalapenos, plus 2 roasted, skinned and chopped jalapenos
- 1 red bell pepper, fine dice
- 1/2 red onion, fine chopped
- 2 dry ancho chiles, seeded, cut into short strips and snipped into pieces
- 1 tablespoon olive oil
- 1 lime, juiced
- Chili powder, salt, and pepper, to taste
- Fresh scallions, cilantro or parsley, to taste
Directions
In a bowl, combine all ingredients. Place in refrigerator for up to 12 hours for flavor infusion.
Serve with tortilla chips.
Good Eats Beef Stew
Ingredients - 1/4 cup tomato paste
- 1/4 cup apple cider vinegar
- 1 1/2 teaspoons Worcestershire sauce
- 1 tablespoon paprika
- 1 1/2 teaspoons dried herbs, any combination of thyme, oregano and rosemary
- 3 pounds English-cut short ribs
- 1 tablespoon plus 1 teaspoon kosher salt, divided
- 1 large yellow onion, thinly sliced
- 1 pound red potatoes, unpeeled and diced small
- Freshly ground black pepper
- 1 tablespoon chopped fresh parsley leaves
Directions
In a large mixing bowl, whisk together the tomato paste, cider vinegar, Worcestershire sauce, paprika and dried herbs. Set aside.
Season the short ribs with 1 tablespoon of the kosher salt. Place a large griddle over medium-high heat and once a drop of water bounces off, sear the meat until browned on all sides. Once browned, remove the meat to the bowl with the paste and toss to coat. Transfer to a large piece of heavy-duty aluminum foil and seal tightly. Place the package into a metal pan and put into a cold oven on the middle rack. Set the oven to 250 degrees F and cook for 4 hours.
Remove the meat from the oven and carefully poke a hole in the pack while holding it over a heatproof container. Drain the liquid into the container and place it into the refrigerator to cool enough so that the fat separates from the rest of the liquid, approximately 1 hour. After 1 hour, transfer the liquid to the freezer and keep there until the fat cap has solidified, approximately 1 hour. Allow the ribs to sit at room temperature while the liquid is cooling or if serving the next day, place in the refrigerator until ready to finish.
Retrieve the liquid from the refrigerator and remove the fat cap that has formed on top. Measure out 1 tablespoon of the fat and reserve the rest for another time. Place the fat into a large saucier and place over medium heat. Once the fat has melted add the onion along with the remaining teaspoon of salt and stir to separate the onions into rings. Allow to cook for 2 to 3 minutes, stirring occasionally. Add the potatoes along with a pinch of black pepper and stir to combine. Next, add the liquid reserved from the meat and stir. Cover tightly and decrease the heat to low so that no heat is escaping the lid. Cook for 30 minutes or until the potatoes are fork tender.
Meanwhile, cut the meat away from the bone, removing the connective tissue and discarding. Once the potatoes are tender, uncover and set the meat atop the vegetables. Cover and continue to cook for 10 minutes. Serve sprinkled with the parsley.
Subscribe to:
Posts (Atom)

